


 Tweet
Tweet
Appliance Tip of the Week...
Oven Temperature Sensor Testing Help
&
Oven Temperature Sensor Replacement Help
Oven temp sensors sense the temperature is the oven cavity and the temp sensor changes resistance, this change in ohm resistance tells the oven control what temperature the oven cavity at and tells the control to shut off the element or turn it back on. The most common temp sensors used today ( *not all ) are approx 1000-1100 ohm resistance at room temperature ( 70 degrees F )
Some ohm readings and their temperature:

CLICK picture to ohm test an oven temp sensor---->
Page says "gas oven" but the procedure is exactly the same for an electric or gas oven temp sensor!
Oven temp sensors and other parts help
*Some different sensor ohm readings at room temp. GE's WB21X158 ( bottom one on the picture ) is approx 16 ohms at room temperature and at 350degrees F it is 29~33 ohms.
Oven Temperature Sensor Replacement
Changing a typical oven temp sensor....
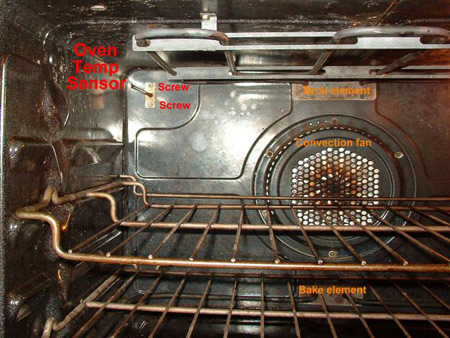
Click on the picture for a larger view
Remove power first.
Due to productions changes and continuous improvements, it may be necessary to use an adaptor wire harness or wire nuts for a compatible connection.
Remove screws from inside the oven ( some newer models like Frigidaire/Kenmore have the 2 screws on the outside at the back ) and pull towards you the inoperative sensor.
If the connection on the sensor or the wire harness is not applicable to your model, use two ceramic hi-temp wire nut connectors to splice the wires together. Strip insulation on each wire approximately 1/2" from the end. On some models, the sensor may be serviced from the front, on others the hole in the oven liner is not large enough for the wire nut/connector to pass through and must be serviced from the rear.
Important: Make sure the wire nuts/connectors are completely through the insulation and not touching the back of the oven cavity.
Once the wire nuts/connectors are properly positioned, reinstall the sensor screws removed earlier.
Range, Stove and Oven parts


Related Linksjeff sr.
Oven Temperature Sensor Testing Help
&
Oven Temperature Sensor Replacement Help
Oven temp sensors sense the temperature is the oven cavity and the temp sensor changes resistance, this change in ohm resistance tells the oven control what temperature the oven cavity at and tells the control to shut off the element or turn it back on. The most common temp sensors used today ( *not all ) are approx 1000-1100 ohm resistance at room temperature ( 70 degrees F )
Some ohm readings and their temperature:
| Degrees F | Resistance |
| 100 | 1143 ohms |
| 200 | 1350 ohms |
| 300 | 1553 ohms |
| 350 | 1654 ohms |
| 400 | 1753 ohms |
| 500 | 1949 ohms |
CLICK picture to ohm test an oven temp sensor---->
Page says "gas oven" but the procedure is exactly the same for an electric or gas oven temp sensor!
Oven temp sensors and other parts help
*Some different sensor ohm readings at room temp. GE's WB21X158 ( bottom one on the picture ) is approx 16 ohms at room temperature and at 350degrees F it is 29~33 ohms.
Oven Temperature Sensor Replacement
Changing a typical oven temp sensor....

Click on the picture for a larger view
Remove power first.
Due to productions changes and continuous improvements, it may be necessary to use an adaptor wire harness or wire nuts for a compatible connection.
Remove screws from inside the oven ( some newer models like Frigidaire/Kenmore have the 2 screws on the outside at the back ) and pull towards you the inoperative sensor.
If the connection on the sensor or the wire harness is not applicable to your model, use two ceramic hi-temp wire nut connectors to splice the wires together. Strip insulation on each wire approximately 1/2" from the end. On some models, the sensor may be serviced from the front, on others the hole in the oven liner is not large enough for the wire nut/connector to pass through and must be serviced from the rear.
Important: Make sure the wire nuts/connectors are completely through the insulation and not touching the back of the oven cavity.
Once the wire nuts/connectors are properly positioned, reinstall the sensor screws removed earlier.
Range, Stove and Oven parts
Related Linksjeff sr.